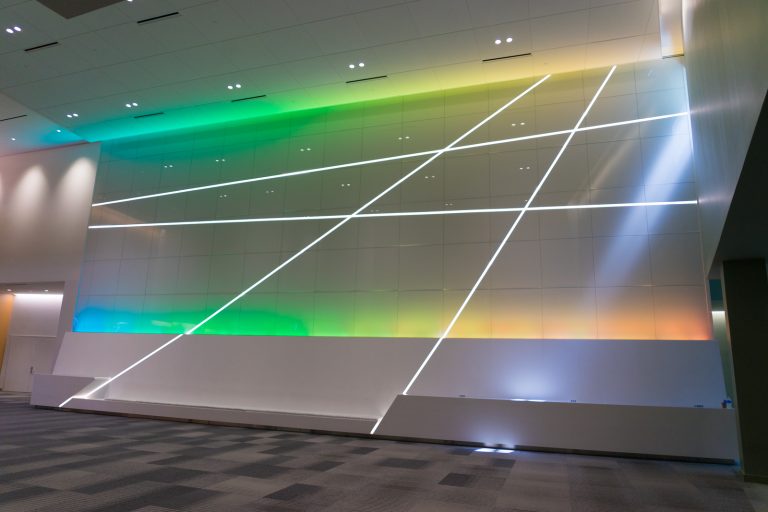
508 Panels of Back Painted Glass: The Columbus Convention Center Node Walls
MP Drafting drew the shop drawings for four back painted glass node walls at the Greater Columbus Convention Center: 508 panels, 8,258 square feet of custom off-white glass, and a hanging system that holds every panel to the wall with magnets.
Location Greater Columbus Convention Center, 400 N. High Street, Columbus, Ohio
General Contractor Corna Kokosing
Architect LMN Architects, with Schooley Caldwell Associates
Shop Drawings MP Drafting (Marcus Dreher)
Hardware and Installation Pinnacle Engineered Products
Glass Glass + Mirror Craft, Wixom, Michigan, now Glass and Metal Craft (Alex Buechel)
The Greater Columbus Convention Center sits on North High Street in downtown Columbus, Ohio, across the street from the Arena District and the Short North. The Franklin County Convention Facilities Authority owns it, and in 2015 the authority started a $140 million expansion and renovation designed by LMN Architects of Seattle, with Schooley Caldwell Associates of Columbus as associate architect. Corna Kokosing and Elford were the general contractors. The work ran 22 months, added about 110,000 square feet, renovated about 800,000 more, and finished in July 2017.
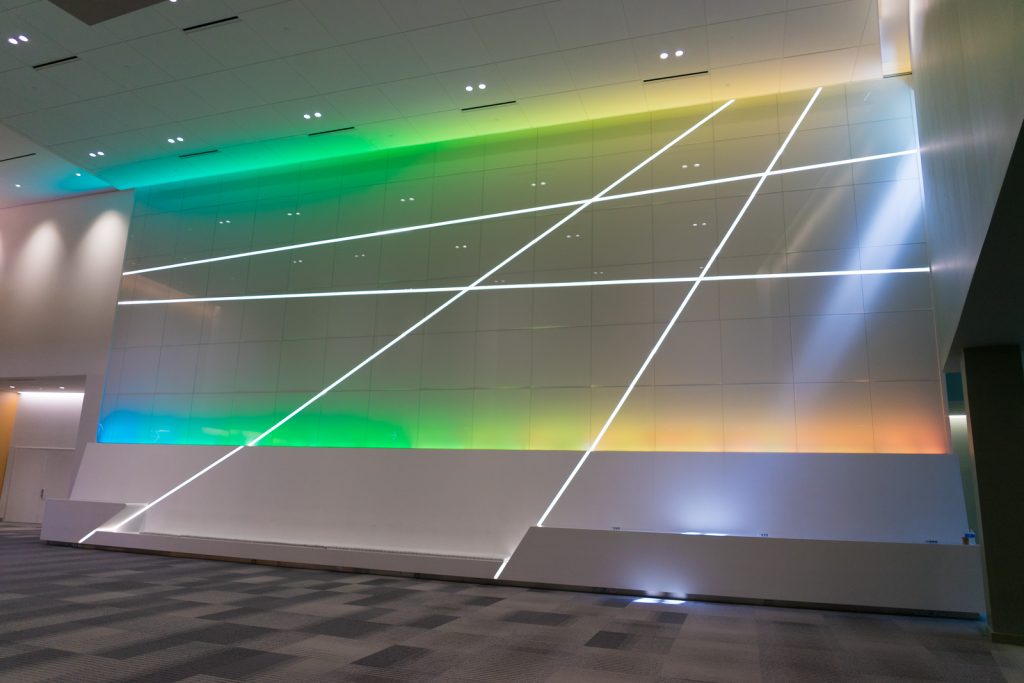
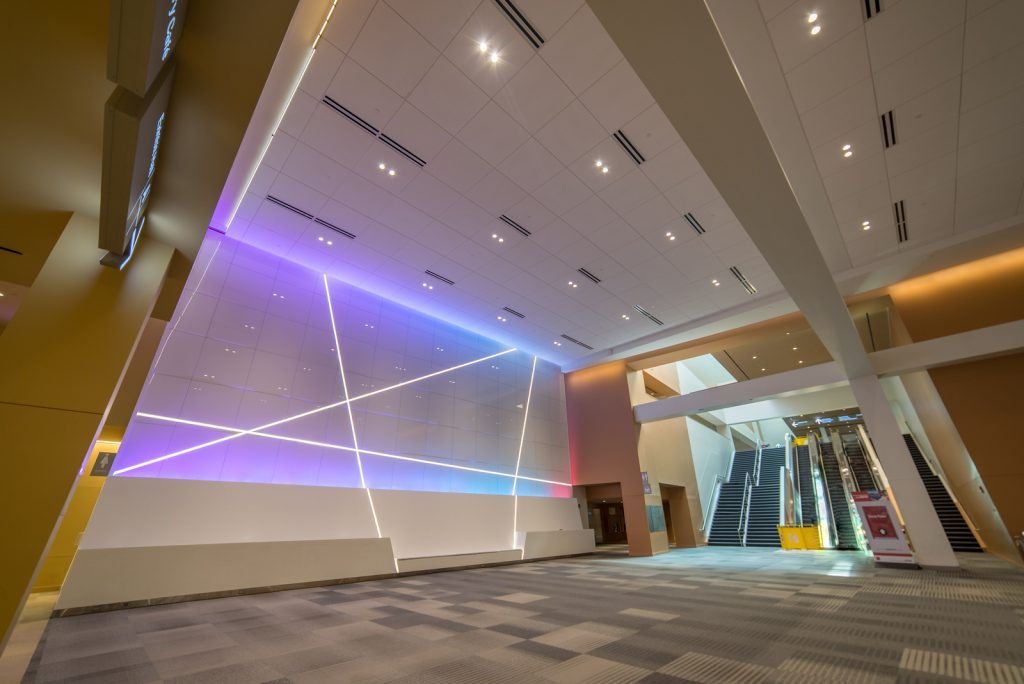
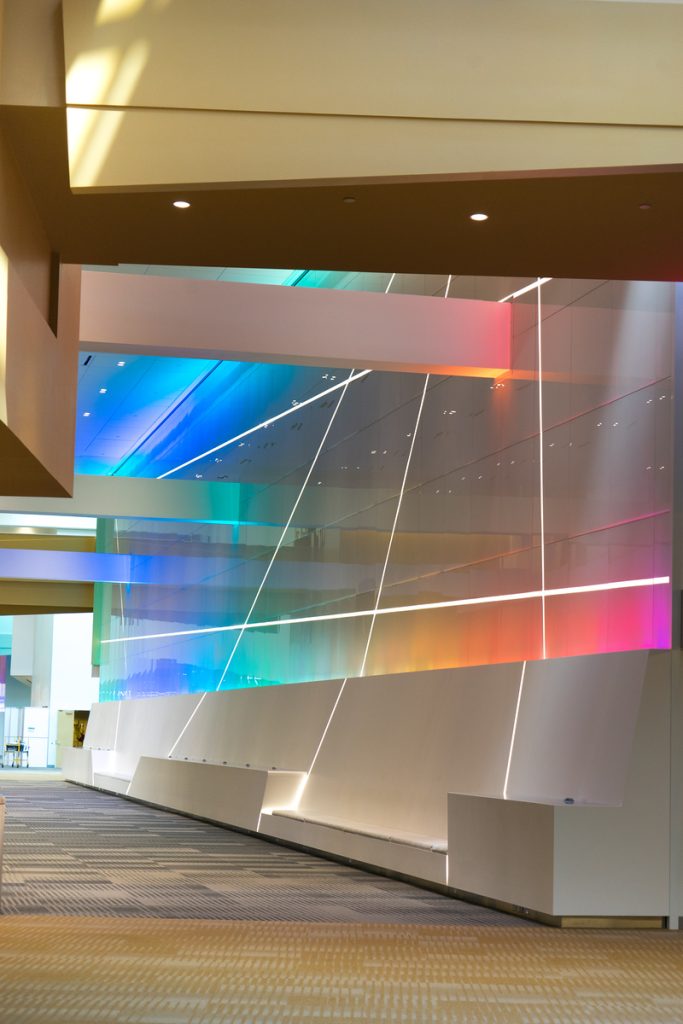
Along the main concourse the architects placed four “node” walls: tall off-white glass walls lit from behind by color-changing LED, with thin diagonal lines of white light running across the face. Gary Boyajian landed the node wall package under Corna Kokosing and put the team together. MP Drafting drew the shop drawings and worked through the design of the attachment system with Pinnacle Engineered Products, which built the channels and brackets and installed the walls. Glass + Mirror Craft in Wixom, Michigan, now Glass and Metal Craft, fabricated the 508 panels of back painted glass. Nothing in the package came from a manufacturer’s standard details. The part of the set worth spending time on is the hanging system, because it changed between the mockup and the install.
Back Painted Glass Node Walls: What Was in the Package
Shop drawings for this project consisted of:
- Custom channels / brackets
- Node wall (1/4″ clear low-iron tempered glass – back painted white)
That is two lines for 508 panels and 8,258 square feet of glass across four walls, most of the panels about 4 feet by 4 feet. The set carries the glass as GL-19, 1/4″ low-iron acid-washed tempered, back painted per approved samples, and the “white” on the list is a custom off-white matched to the architect’s material on the lower part of each node wall. The channel was a custom aluminum extrusion drawn and extruded for this job, with a plastic lens that sits on it to diffuse the LED. There was no storefront or curtain wall in the scope, so the set reads more like a custom fabrication package than a glazing package.
Forty-Four Feet Up, a Hundred and Sixty Feet Long
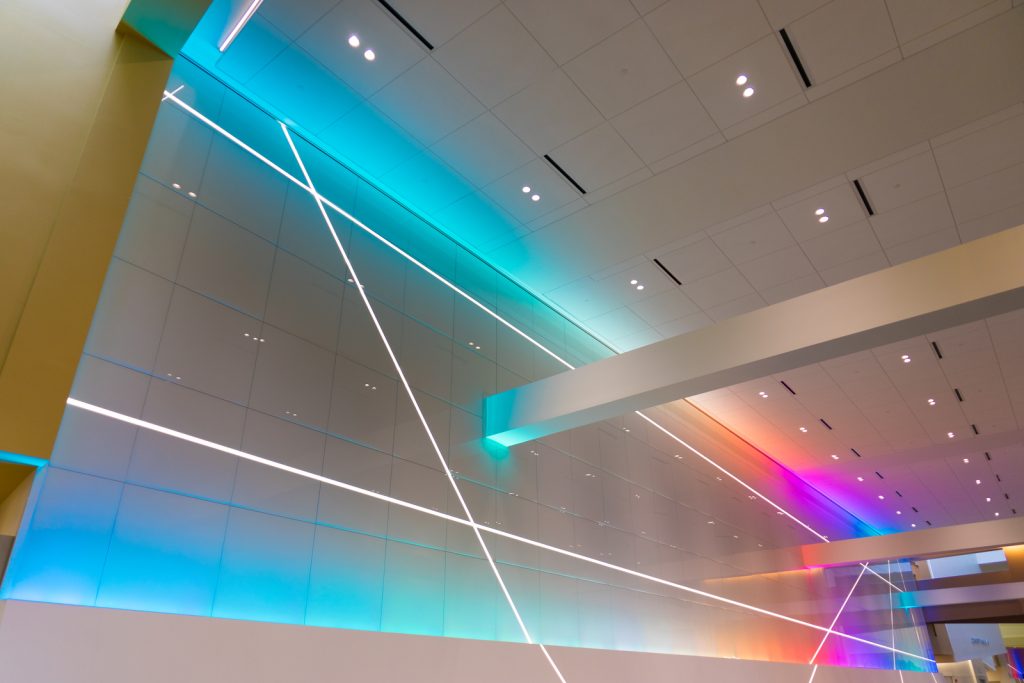
The elevations are where the job stops sounding like a decorative glass order. Elevation 1 is a 33 foot wide wall that runs 44 feet from the concourse floor to the parapet line, with panels on a 4 foot module and 1/8″ gaps between them. Elevation 3 is 23 feet tall and 160 feet long, and it carries the diagonal light lines across more than 40 columns of glass. Every panel on every elevation is the same GL-19, so the schedule is one line and the elevations are the whole story.
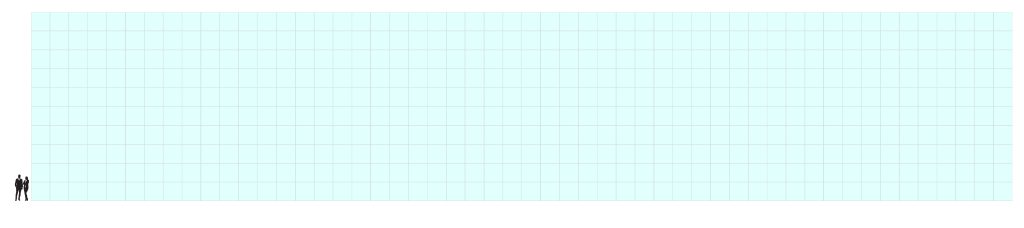
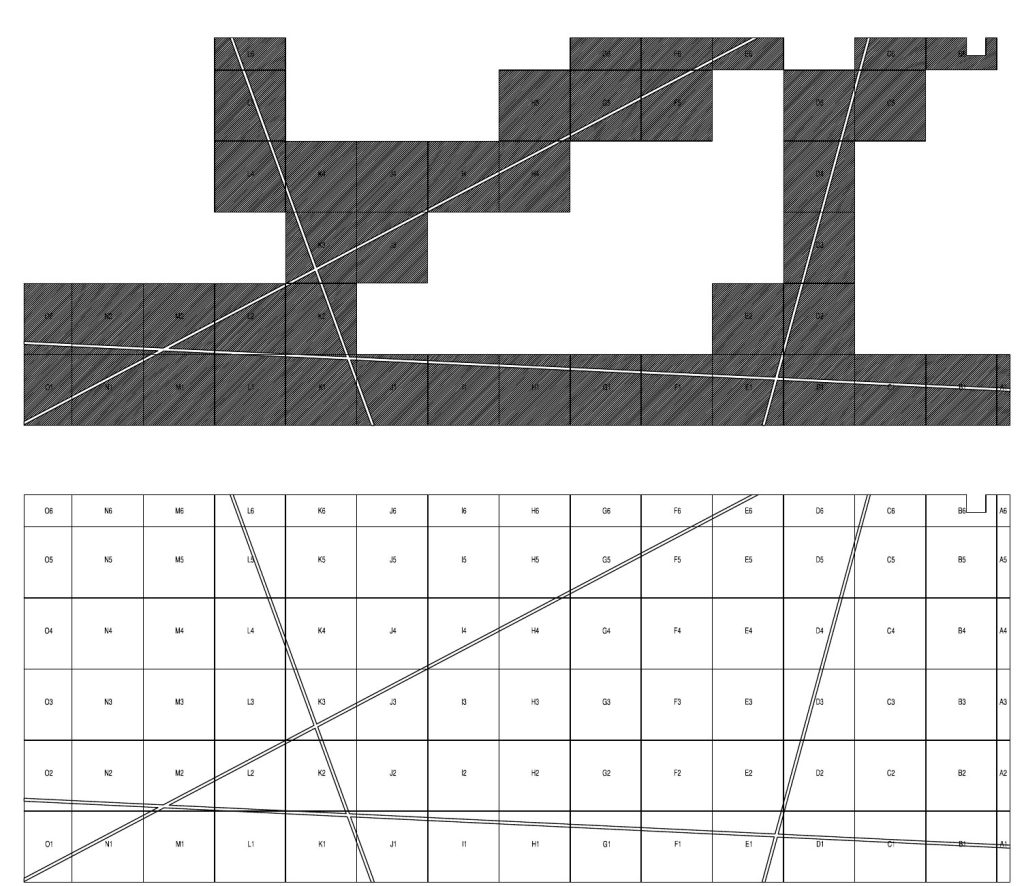
The drawing above is not one wall. It is all 508 panels from the four node walls pulled into a single rectangle so the quantity has something to stand next to. A 4 foot panel comes up to a person’s shoulder; multiply that by 508 and you get the block in the drawing. In the building, that glass is spread across four walls that run about six panels tall and up to 160 feet long, so the block understates how far it stretches. The layout drawing labels every panel by column letter and row number, A1 through O6 on one wall, so a panel that comes off the truck as “K3” has one place it can go. That matters more than it sounds on a wall where the light lines cross panel joints, because a panel one position off puts a kink in a line that runs 160 feet.
Off-White Is Not One Color
Five hundred panels of one color sound simple until the second one goes up next to the first. The paint was a custom match to an architect-selected material on the lower node walls, an off-white that runs through the whole convention center, and the fabricator ran color tests and adhesion tests against that target before production. The hard part of the match was the glass itself. Even low-iron glass has a faint blue tone, and an off-white behind it reads cooler from the face than it does on the sample, so the paint color was skewed to offset that tone and the match was judged through the lite, not on the back. All of the glass was ordered in one batch and all of the paint in one batch, so nothing shifted over the weeks it took to cut, polish, temper, and paint the run, and the paint went to an automated paint line instead of a spray booth.
Every finished panel was then checked against the approved sample with a spectrophotometer at five points, the center and the four corners, so the color held edge to edge, and to a tolerance tighter than an automotive paint shop uses. Three people in the decorative department, with a process engineer in and out, ran the glass for a couple of months, and one of them signed off on every panel or pulled it. Checking all 508 at five points is slow, and it is arguably more than a wall seen from across a concourse needs. The alternative is finding the one off-color panel after it is hung, which costs a crew on a lift and a remade panel.
The Lines
The diagonal lines are strips of the glass left open through the paint, so the LED behind them reads as a soft white line. Each strip was masked by hand down the full length of the panel before paint, and because the lines run across panel joints, the tape on one panel has to land exactly where the tape on the next one picks up. That made a panel pulled by the shop’s own QC the worst outcome on the job. A remade panel had to be taped so the line met its neighbors on both sides, and getting that line straight again on a replacement was harder than any part of the first run.
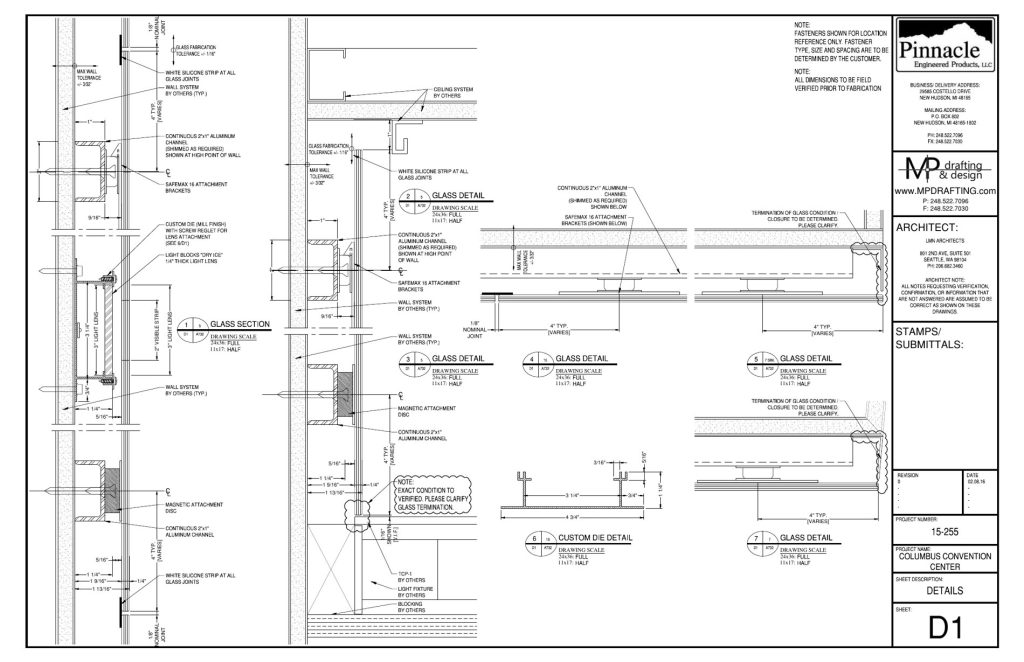
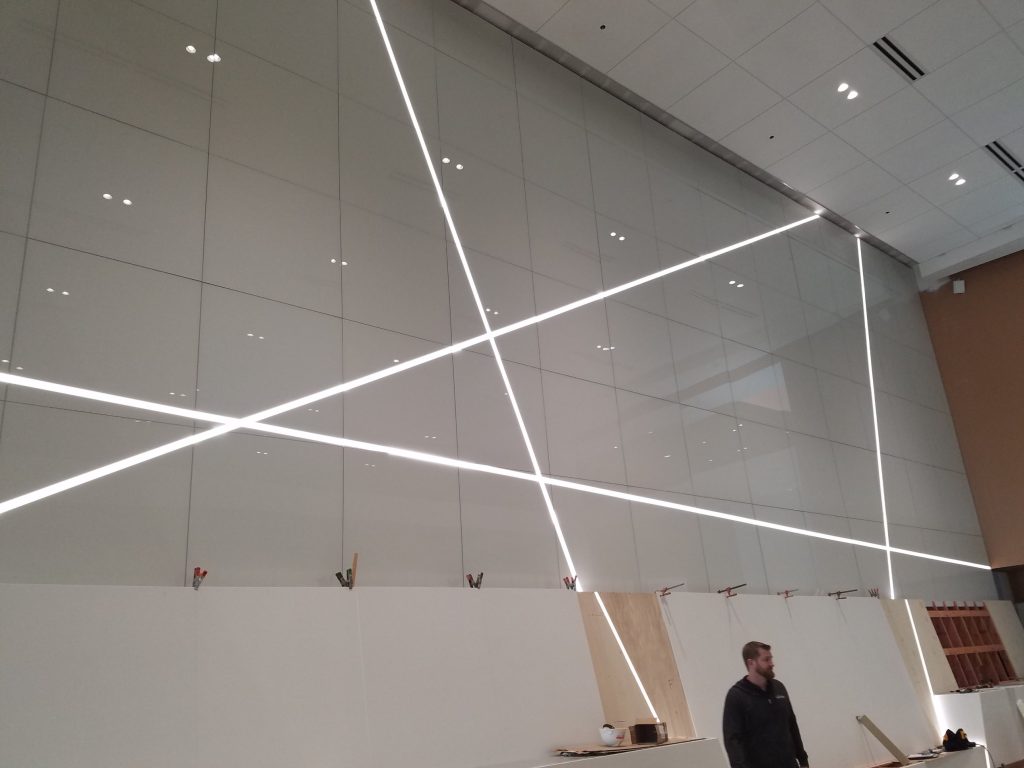
Behind each strip sits a custom mill-finish die with a screw reglet that holds a 1/4″ light lens, and the set calls for a 2″ visible strip of light inside a 3″ lens. The color wash on the face comes from LED behind the glass, and every 1/8″ joint between panels gets a white silicone strip so the backlight does not read through the gaps. LMN Architects describe the node walls as “luminous glass walls that reflect natural light from openings to the sky and street,” and the LED does the same job after dark. Horton Lees Brogden was the lighting designer, so the glass side drew the channel, the die, and the strip layout, and the color program was theirs.
Magnets, Pucks, and a Mockup That Had to Change
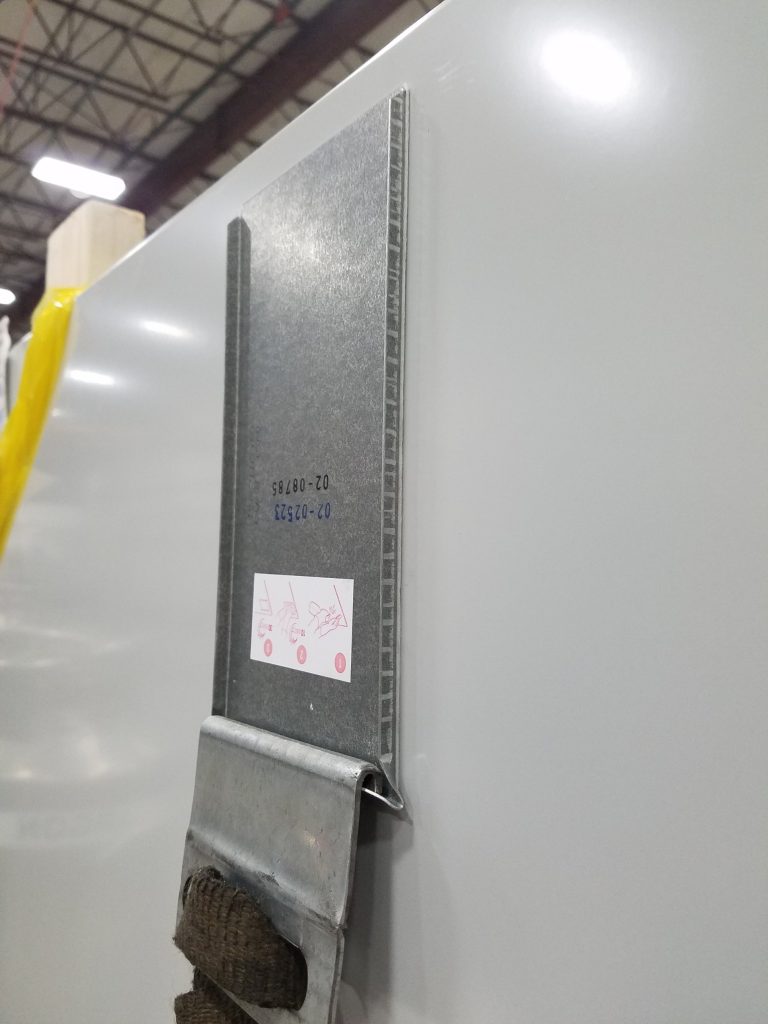
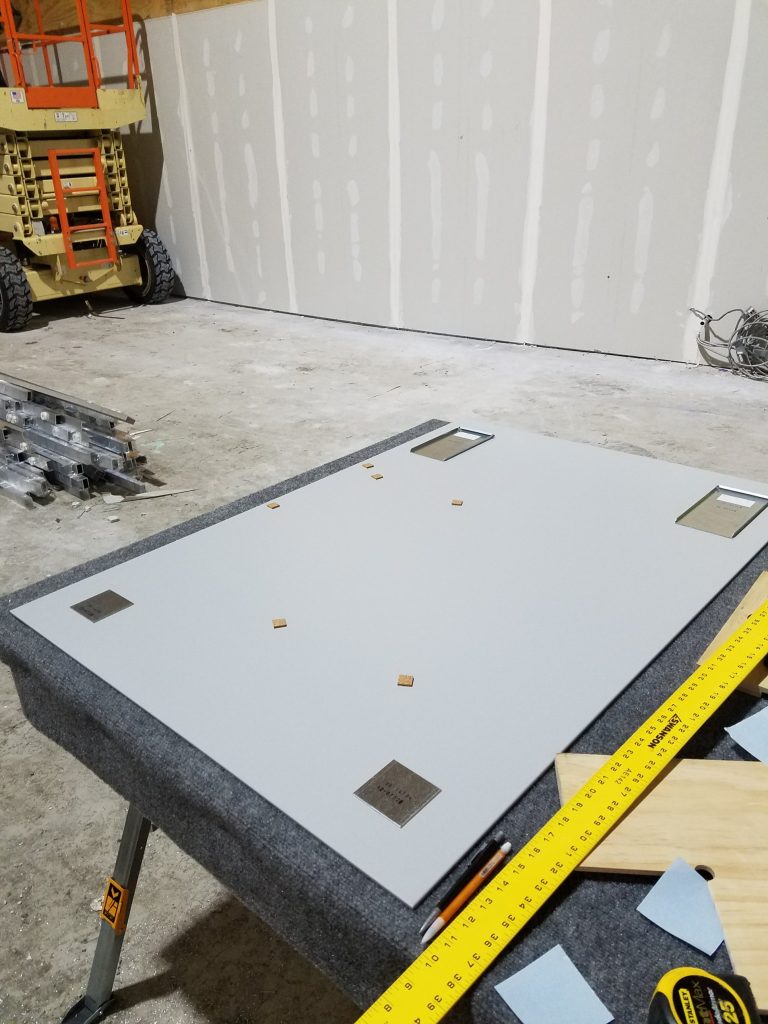
The attachment is the part nobody can see once the wall is up. The set calls out a continuous 2″ by 1″ aluminum channel on the wall, shimmed as required against a wall tolerance of plus or minus 3/32″, with Bohle SafeMax 16 attachment brackets and a magnetic attachment disc, the puck, at each hanging point. The bracket is a galvanized plate bonded to the painted back of each panel, so the paint sits between the bracket and the glass and carries the load. That is why the adhesion tests mattered: the coating had to be opaque enough to hide the hardware and bonded well enough to hang a tempered lite. A panel goes up by setting it onto its pucks and letting the magnets pull it home.
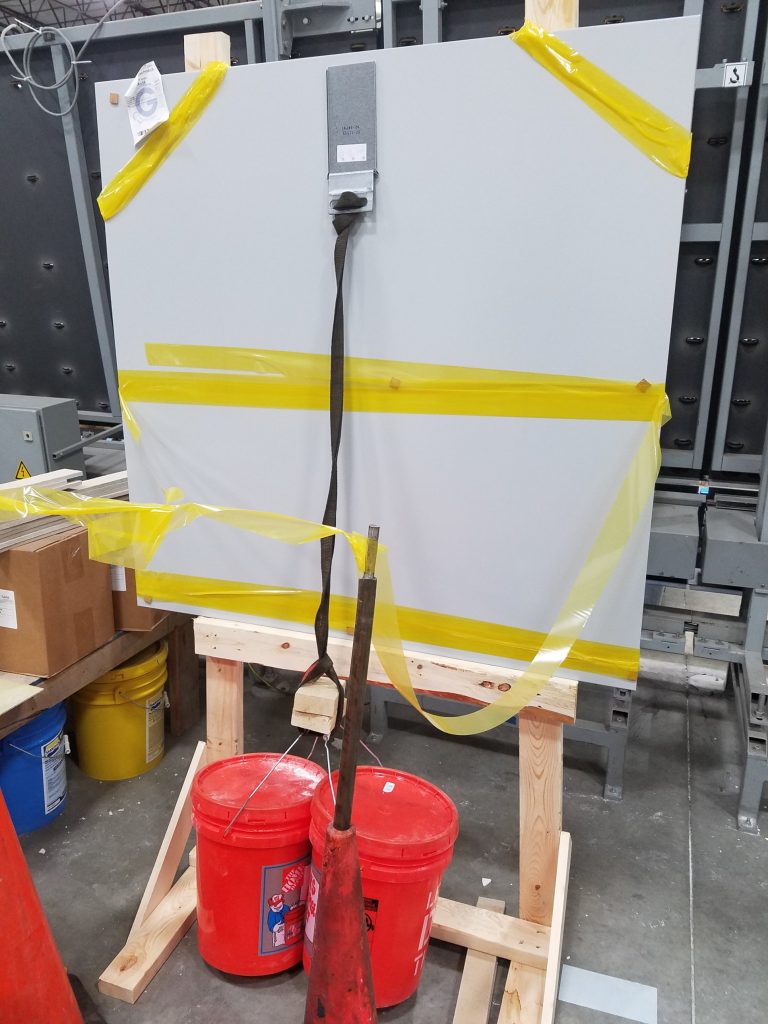
The first version on the mockup was not the version that shipped. The team hung panels on it, learned what moved, and revised the system more than once before anything went to the extruder. The shop also load-tested a hanger the plain way: one bracket on a painted panel, a strap through the hook, and two buckets of weight hanging off the strap on an A-frame. If you have ever set a panel onto an attachment that was 1/8″ off, you know a magnetic system is only as good as the location of the bracket on the back of the glass. So the fabricator built mounting templates to locate each bracket on each panel the same way every time, and each panel got its pads and a foam spacer on the back before it left the table. Once the glass came off the line in Wixom, every panel was kitted and delivered in install order, so the crew on High Street was not sorting 508 lites on a concourse floor.
What the Set Looked Like
MP opened job 15-255 in 2015 and the first submittal went out on February 8, 2016, drawn from the conformed documents dated January 18. It is an eight-sheet set: a cover sheet, four elevation sheets, and one detail sheet, under the Pinnacle Engineered Products title block with MP Drafting’s name beside it. The cover carries one glass type, one system type (“custom channel / bracket node wall system”), mill finish, and a field verified box that is checked. The details sheet carries the tolerances that made the color work possible: glass fabrication at plus or minus 1/16″ and the wall at plus or minus 3/32″, with the channel shimmed to take up the difference.
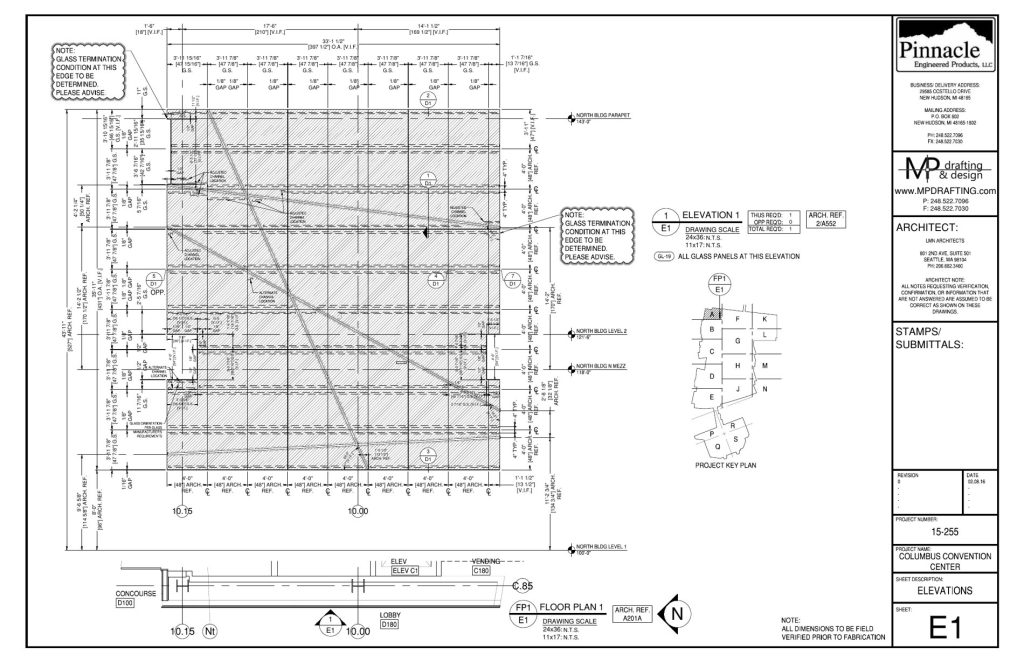
Every elevation also carries a cloud that says “glass termination condition at this edge to be determined, please advise,” because the architect had not settled how the glass ends against the adjacent finishes when the set went out. The drawings note the fastener type, size, and spacing were to be determined by the customer, and that all dimensions were to be field verified prior to fabrication. Those clouds are what a first submittal is for, and on this job the answers came back before the glass was cut.
Plywood, Channels, Then Glass
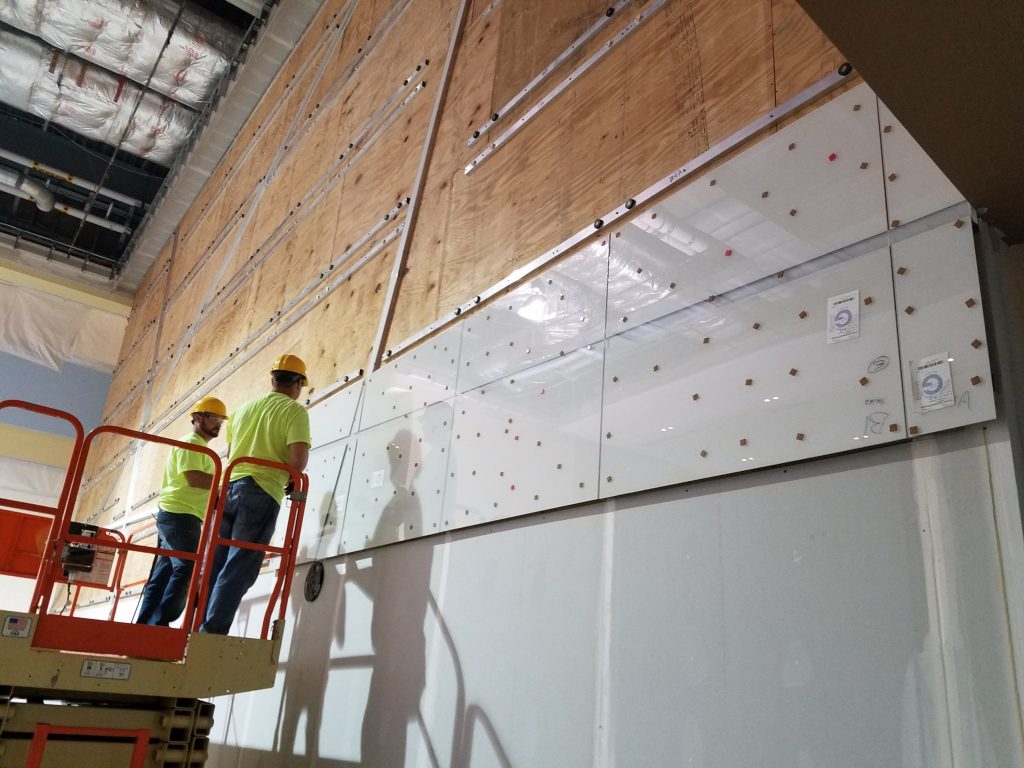
The wall behind the glass is plywood on the building’s framing, and the first thing on the plywood was a green laser line. The crew screwed the horizontal channels to the plywood off that line on a lift, one row at a time, and set the diagonal LED channels across them. The photos show the plywood covered in short lengths of channel before any glass arrives, which is the whole hanging system sitting on the wall in plain view, and the last time anyone sees it.
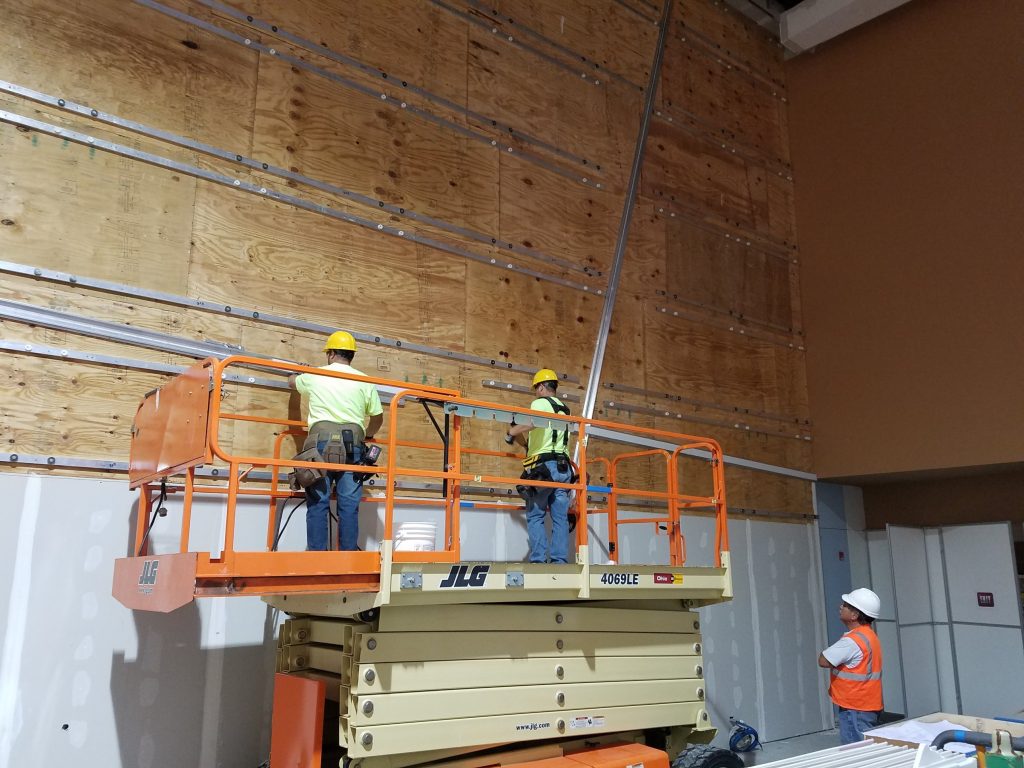
The glass went up from the bottom, starting at the lowest row and working up. Each panel came off the kit with its brackets, pads, and a panel number on the back, went up on the lift, and set onto its pucks. The reflection of the plywood and the LED channels in the first row of glass is the same reflection the lighting designer was planning for, and once the LED came on the channels disappeared behind the diffused light.
Five Thousand Pounds of Vegetables
The node walls were one line in a long list when the building reopened. In the July 2017 release, the general manager said the owners had turned the facility into “the crown jewel of convention centers,” and the same release announced an indoor farm being installed that month, the first in a convention center, meant to grow nearly 5,000 pounds of vegetables and herbs a year for the kitchens. The same list has the glass as one item, decorative lighting and colorful node walls in the concourse, which is where a visitor finds them.
What to Write Into the Next One
On any back painted job where panels butt, put the color check in the submittal: the fabricator names the instrument, the tolerance, and the number of points per panel, the approved sample is the reference, and every panel is checked before it ships, not after it hangs. Order the full glass quantity and the full paint quantity before the first cut, because a second batch of either is a second color. Those two lines cost nothing to write, and on this job they are the reason the fabricator could sign off on every panel against the same sample.
The shop drawings carry MP job number 15-255. Two of the people who ran this job now work together at GlazierIQ: Marcus Dreher drew the set at MP Drafting and worked the hardware design through Pinnacle Engineered Products, and Alex Buechel ran the glass through fabrication and checked the color on every panel at Glass + Mirror Craft. That is how a 2015 set came back up in 2026. Whether a second wall like it ever gets built is an open question; the set is still in the file.
Have a Decorative Glass Package With No Standard Details Behind It?
MP Drafting draws custom glass walls, all-glass systems, and the channels and brackets that hold them up. When the attachment needs engineering, it comes on the same set. Send the architectural set and the finish schedule, and we will scope it. MP has drawn other Columbus work since, including the Barnett Branch Library.
Use Education to Get Ahead
Every missed deadline creates a ripple effect. Delayed fabrication, wrong orders, wasted time in the field. One way to cut that risk is by training your team to review drawings effectively.
LearnGlazing’s Shop Drawing Course makes it easier to spot issues before they become emergencies. Explore the course.
 Take the Course for Free